.png)
.png)
.png)
How to Install a Fire Pump Waste Cone Properly
Sep 29, 2025
Share:
A reliable fire pump system is the heart of any building’s fire protection setup, and every component plays a vital role in ensuring its efficiency. One often overlooked yet essential part of the system is the fire pump waste cone. Proper installation of the waste cone is critical to achieving stable system performance, preventing unnecessary water hammer, and ensuring compliance with NFPA 20 standards.
In this article, we will explain what a fire pump waste cone is, why it is necessary, and provide a detailed step-by-step guide on how to install it correctly. We will also cover common mistakes, best practices, and professional recommendations from industry experience.
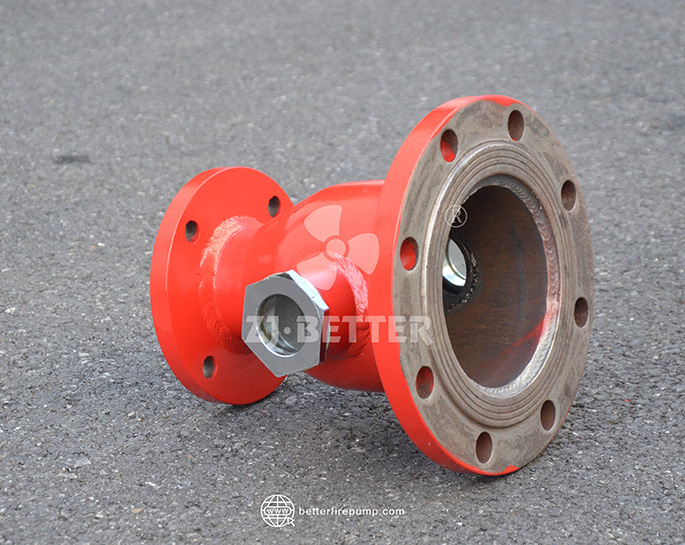
What Is a Fire Pump Waste Cone?
A fire pump waste cone is a specialized fitting installed on the discharge piping of a fire pump system. Its main purpose is to direct water to waste during flow tests, system maintenance, or pressure relief events.
Unlike standard piping connections, a waste cone is engineered to minimize turbulence, reduce backpressure, and allow water to exit smoothly. When paired with a flow meter, test header, or relief valve, it helps maintain stable pump operation during system testing.
Why Is the Waste Cone Important?
Fire pumps must be tested regularly to ensure they meet design flow and pressure requirements. During these tests, a large volume of water must be discharged safely. The waste cone makes this possible by:
-
Reducing turbulence: Ensures stable water flow and prevents vibration damage.
-
Preventing cavitation: Smooth discharge helps avoid pump wear and early failure.
-
Protecting downstream piping: Reduces the risk of water hammer and pipe stress.
-
Ensuring compliance: NFPA 20 requires proper arrangements for testing and discharge.
-
Simplifying maintenance: Provides a safe and controlled point for water release.
Without a correctly installed waste cone, the entire fire pump system could experience operational inefficiency, excessive wear, and costly downtime.
Key Considerations Before Installation
Before beginning installation, engineers and contractors must consider several critical factors to ensure the waste cone functions as intended:
-
Location:
-
The waste cone should be installed on the discharge side of the fire pump, usually after the flow meter or relief valve.
-
Ensure sufficient clearance around the area to allow for proper water discharge.
-
-
Orientation:
-
Position the cone so that discharged water flows smoothly into a drain or waste line.
-
Avoid sharp bends or obstructions in the discharge path.
-
-
Materials:
-
Select corrosion-resistant materials suitable for fire protection applications.
-
Cast iron, ductile iron, or stainless steel are common choices depending on system specifications.
-
-
Drainage Capacity:
-
Confirm that the drainage system can handle the maximum pump flow during testing.
-
Oversized drains are better than undersized ones to prevent overflow.
-
-
Standards Compliance:
-
Follow NFPA 20 guidelines for waste cone installation.
-
Ensure local authority requirements are also met.
-
Step-by-Step Guide: Installing a Fire Pump Waste Cone
Step 1: Prepare the Piping System
-
Shut down the fire pump and isolate the discharge line.
-
Verify that all valves are closed and the system is depressurized.
-
Ensure the piping section where the waste cone will be installed is clean and free of debris.
Step 2: Position the Waste Cone
-
Align the waste cone with the discharge piping and drainage system.
-
Confirm that the installation angle allows for smooth, downward water flow.
-
Make sure no obstructions exist in the discharge path.
Step 3: Secure the Connections
-
Attach the waste cone using flanged or grooved couplings as per design specifications.
-
Use gaskets and seals that are rated for fire pump pressures.
-
Torque bolts evenly to avoid leaks and ensure proper alignment.
Step 4: Connect to Drainage
-
Extend piping from the outlet of the waste cone to a proper drainage point.
-
Avoid sharp bends that could cause turbulence.
-
Ensure the drain line diameter matches or exceeds the discharge requirement.
Step 5: Verify Flow Direction
-
Double-check that the waste cone is aligned in the direction of water discharge.
-
Incorrect orientation can lead to backflow or system inefficiency.
Step 6: Conduct a Pressure Test
-
Once installed, perform a hydrostatic test to confirm the integrity of connections.
-
Check for leaks, vibration, or abnormal noise during flow.
-
Verify that the discharged water is flowing smoothly without causing pipe stress.
Step 7: Document the Installation
-
Record the installation details, including date, location, and inspection results.
-
Keep this documentation for future reference and compliance audits.
Common Mistakes to Avoid
-
Improper Alignment
Installing the waste cone at the wrong angle or direction can cause turbulence and excessive vibration. -
Undersized Drainage
If the drain line cannot handle the pump’s maximum flow, water may back up and damage the system. -
Skipping Hydrostatic Testing
Failure to pressure-test the installation could lead to hidden leaks or long-term pipe stress. -
Using Incorrect Materials
Low-quality materials may corrode or fail under fire pump operating conditions. -
Ignoring NFPA 20 Requirements
Non-compliance may result in failed inspections and costly rework.
Best Practices for Long-Term Reliability
-
Routine Inspections: Regularly inspect the waste cone for wear, corrosion, or blockages.
-
Preventive Maintenance: Flush the waste cone periodically to prevent buildup of debris.
-
Testing Alignment: During annual fire pump tests, observe the discharge to ensure smooth operation.
-
Upgrade When Necessary: Replace outdated or corroded waste cones with modern, corrosion-resistant models.
-
Professional Installation: Always use trained technicians familiar with fire pump systems and NFPA standards.
Compliance with NFPA 20
The National Fire Protection Association (NFPA 20) clearly outlines requirements for fire pump installation, including waste cone placement. According to the standard:
-
All fire pumps must have a means for conducting performance tests.
-
Waste water must be discharged safely without damaging the system or surrounding area.
-
The discharge arrangement, including the waste cone, must prevent excessive pressure buildup.
Following NFPA 20 ensures both regulatory compliance and operational safety.
Conclusion
The fire pump waste cone may appear to be a minor component in a complex fire protection system, but its proper installation is essential for safety, efficiency, and compliance. When installed correctly, it prevents turbulence, protects piping, and ensures reliable pump operation during testing and maintenance.
By following the correct installation procedures—selecting the right location, ensuring proper alignment, securing quality materials, and testing thoroughly—you can extend the lifespan of your fire pump system while maintaining compliance with NFPA 20.
A well-installed waste cone isn’t just about technical accuracy—it’s about ensuring that when the time comes, your fire protection system performs flawlessly and safeguards lives and property.